How to use Swagger with Spring Boot
In nowadays applications, front-end and back-end are often works as separate components and interacting with each other when required. Normally, we publish APIs as a back-end services to access from the front-end or other 3rd party applications.
In a scenario like this, it is required to have a proper API documentation for the back-end services. The API specification documentation should be readable, informative, and simple to follow
Also, The API specification documentation must show and describe each and every change applied to the API. To achieve this manually developers will have to put extra efforts and it’s very difficult to keep the track of API changes. It’s basically a tedious exercise, so automation of this process was inevitable.
What is Swagger ?
Swagger is a API specification documentation which describes the structure of available API’s. Why Swagger is awesome this much is because it’s renders all the API details via Swagger UI on web browser. Also we can generate client libraries automatically for the API’s in different languages and can perform automated testing.
How to use Swagger with Spring Boot ?
In this article, we are going to learn about how to use Swagger 2 in a Spring Boot application. For this we are going to use the Springfox implementation for Swagger 2 specification. Follow below instructions properly to apply swagger to a Spring Boot application. As for the IDE we are going to use Intelij for this tutorial. In here we are going to create a API class called PersonController with few endpoints and swagger specification for the API.
Create a new Project by navigating in to File -> New -> Project and select Spring Initializer and click on Next.

On the metadata screen. Fill the required details as below and click on Next

Select the location where you need to save the project and click on finish.
Create a package named controller under the root package and add a Class called PersonController. Change the PersonController class as below.
package com.swagger.swaggerdocumentation.controllers;

import org.springframework.web.bind.annotation.*;
import java.util.Map;

@RestController
@RequestMapping("person")
public class PersonController {

    @GetMapping("/name")
    public String personName(){
        return "Alex Silva";
    }

    @GetMapping("/address")
    public String personName(@RequestParam("personName") String personName){
        return personName+", No. 12/3, Test Road, Test City";
    }

    @PostMapping("/")
    public String savePerson(@RequestBody Map personDetails){
        return personDetails.get("personName")+" Details Saved";
    }

    @PutMapping("/")
    public String updatePerson(@RequestBody Map personDetails){
        return personDetails.get("personName")+" Details Updated";
    }

    @DeleteMapping
    public String deletePerson(@RequestParam("personName") String personName){
        return personName+ " Details Deleted";
    }
}
Run the application and make sure that the APIs are working correctly. If the endpoints are working without any issues lets apply Swagger to the endpoint. Open pom.xml file and add below dependencies to the file.
        <dependency>
            <groupId>io.springfox</groupId>
            <artifactId>springfox-swagger2</artifactId>
            <version>2.9.2</version>
        </dependency>
        <dependency>
            <groupId>io.springfox</groupId>
            <artifactId>springfox-swagger-ui</artifactId>
            <version>2.9.2</version>
        </dependency>
Open main class and change it as below. @EnableSwagger2 will enable the swagger documentation for the services. api() is the API configuration for swagger. You can change the swagger UI default description with apiInfo()
package com.swagger.swaggerdocumentation;

import org.springframework.boot.SpringApplication;
import org.springframework.boot.autoconfigure.SpringBootApplication;
import org.springframework.context.annotation.Bean;
import springfox.documentation.builders.ApiInfoBuilder;
import springfox.documentation.builders.PathSelectors;
import springfox.documentation.builders.RequestHandlerSelectors;
import springfox.documentation.service.ApiInfo;
import springfox.documentation.service.Contact;
import springfox.documentation.spi.DocumentationType;
import springfox.documentation.spring.web.plugins.Docket;
import springfox.documentation.swagger2.annotations.EnableSwagger2;

@EnableSwagger2
@SpringBootApplication
public class SwaggerDocumentationApplication {

	public static void main(String[] args) {
		SpringApplication.run(SwaggerDocumentationApplication.class, args);
	}

	@Bean
	public Docket api() {
		return new Docket(DocumentationType.SWAGGER_2).apiInfo(apiInfo()).select()
				.apis(RequestHandlerSelectors.any())
				.paths(PathSelectors.any())
				.build();
	}

	ApiInfo apiInfo() {
		return new ApiInfoBuilder().title("Person Swagger Documentation")
				.description(
						"Person System Service API Documentation")
				.termsOfServiceUrl("").version("1.0.1").contact(new Contact("ABC PVT LTD", "https://www.abc.com/", "-")).build();
	}

}
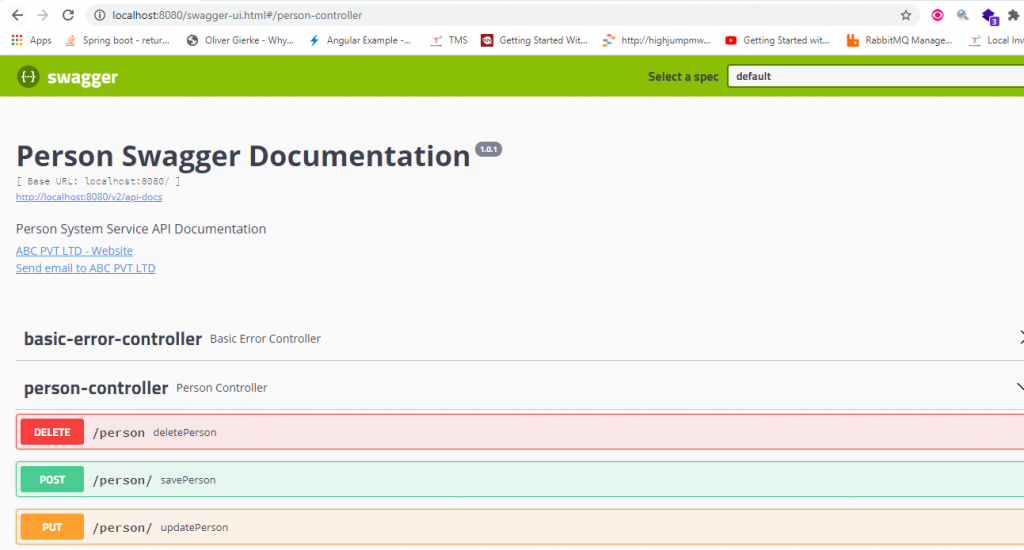
Finally, run the application and navigate in to http://localhost:8080/swagger-ui.html you will be able to see the API specification as below


